

all-creatures.org
Vegan - Vegetarian Recipe Book
How Mary and Frank and Friends Eat
"We are dedicated to cruelty free living through a vegetarian -
vegan lifestyle."
"Let no animal die that we may live!"
| Home Page | Recipes Table of Contents |
How We Make Bread
Bread Making Instructions and Photos
(click on the photos or links to enlarge)
Good wholesome bread making is a lot of fun. We get to experiment with different ingredients and flavors, and the joy of eating a freshly ground whole grain bread fresh from the oven. This bread (roll) making was one of those times, and as we started, we grabbed our digital camera so we could share this experience with you. During this culinary excursion, we will show you the ingredients, utensils, equipment, and the various stages in the process from selecting the whole grains to taking the fresh hot bread out of the oven, and it all took less than two hours.
We decided to make dark multi-grain rolls.
Ingredients:

4 tsp. Yeast, dry baking

1-1/2 cups Spelt, grain
1 cup Wheat, grain (hard red)

1/2 cup Rye, grain

1/4 cup Kamut�, grain

1/4 cup Barley, grain

1/4 cup Lentils, dry

1/4 cup Millet, grain

1/4 cup Carob, powder
1 tsp. Soy Lecithin
2 cups Water (approximately)
Utensils and Equipment:


Vita-Mix with dry grinding container (left)
Bread Maker (right)
![]()
Spatula, rubber


Measuring cups, dry (left) - Measuring spoons (right)


Measuring cup, liquid (left) - Baking pan, stoneware (right)
Preparation:

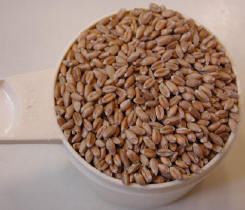
(Grinding Grain - 1) Our first step in grinding the grain is to place 2 cups of the grain in our Vita-Mix "dry container". No more than 2 cups of grain should be ground at a time. In this container we have 1 cup of spelt on the bottom and 1 cup of hard red wheat on the top.

(Grinding Grain - 2) Start the Vita-Mix and turn the speed to the highest setting. As it starts to grind, the grain will be drawn down the center and the ground grain will be pushed up along the sides of the container. As the grain turns into flour, it will begin to bunch up along the side of the container as shown in the photo. Turn off the power and scrape down the flour with a rubber spatula and continue grinding until the desired consistency is reached. Repeat as necessary. Do not grind more than 2 minutes. The flour from this grinder is about the consistency of stone-ground flour. The grinding process produces a lot of heat, and it is important not to overheat the flour. Add the flour to the dough mixer. CAUTION: If the flour is too hot to comfortably hold in your hand, let it cool before adding to the yeast in the dough mixer. Repeat the process with the remaining grain.

(Flour - Carob) After all the flour has been added to the dough mixer or bread maker, hollow out the center of the flour to make a "bowl", and add 1/4 cup of carob powder to make a dark bread.

(Flour - Carob 2) When carob powder gets wet it becomes slippery and could make the dough mixing more difficult. We have learned to premix the carob with the flour so this doesn't happen. Using a rubber spatula, blend the flour and carob powder together, and then create another "bowl" in the center of flour mixture, as shown in this photo.

(Lecithin) We have found that adding about 1 teaspoon of organic soy lecithin to the dough lessens the tendency of the dough to stick to the sides of the container and to your hands. Add the lecithin to the center of the "bowl" in the flour. Do not mix.

(Water) Add about 1 cup of the water on top of the lecithin in the "bowl" of the flour, and turn the mixer on. The flour will swirl around and fall over the water as it is drawn down the center of the mixing container.

(Mixing) As the flour and water begin to mix together to form the bread dough, it begins to clump as shown in this photo. Add a little additional water and continue mixing. Use your rubber spatula to scrape down the dough that has stuck to the sides of the mixing container.

(Kneading 1) As additional water is added and the kneading continues, the small clumps of dough begin to form larger and larger clumps until it all comes together to form one large dough ball, as pictured here.

(Kneading 2) Once the dough has formed into one ball, water should only be added when the dough "dries" or "stiffens". An easy way to tell if the dough has enough moisture is to stop the kneading process and observe the dough. If it sags, it has enough liquid; if it does not sag, add about a teaspoon of water and continue kneading. Repeat as necessary. As the kneading process continues, the dough will get a "springy" texture and become smooth, as portions of this dough ball have already become. Total kneading time should be about 20 minutes.

(Shaping 1) At the completion of the kneading process, the dough has taken on a deep brown color and the surface of the dough is smooth. This dough is being made into rolls with rolled oats on the surface. Place a layer of rolled oats on a clean counter top. Remove the dough from the mixer, form into a ball, and place on the oats as pictured here.

(Shaping - 2) Roll out the dough ball in the oats and form into a "log" about 18 inches long. The light color of the oats adds an interesting contrast to the dark color of the dough. The oats also keep the dough from sticking to the counter top.

(Shaping - 3) The third step in the shaping of the dough into rolls is to cut the 18 inch long "log" in half, and then cut each half in half, making quarters. Then cut each quarter log into three equal pieces, as shown above.

(Shaping - 4) The fourth and final step in the shaping process of the 12 rolls is to take each 1/12 cut of the "log" and press the cut ends into the oats and re-form into the desired shape, as pictured above. Then place each oat coated dough piece on the baking pan which has been covered with a dusting of corn meal.

(Rising - 1) Our oven has a warming drawer below the oven, which is excellent for rising dough, when set on "low". Place the baking pan and rolls in the warming drawer, or as an option, in the oven, if the oven can be set to a low temperature of 110 degrees F. It usually take from 30 to 45 minutes for the dough to rise.

(Rising - 2) When the dough doubles in size, it is ready to bake. Remove the baking pan from the warming drawer and place in the preheated oven at 350 degrees F. If the oven was used for dough rising, then turn the oven up to 350 degrees F.

(Baking) Different ovens seem to bake slightly differently. We have found that rolls bake in about 25 to 35 minutes in a preheated oven at 350 degrees F. Our present oven takes 30 minutes for rolls and an additional 10 to 15 minutes for a half batch loaf of bread and about 50 minutes for a large loaf. Before removing the rolls or bread from the oven tap your finger on the surface of the bread or rolls. If it is firm, the bread is done. We have found that there is a little trial and error learning curve with bread baking. Once you learn the baking times for your particular oven, you will find a consistency in your bread baking.

(Finish) The baking pan of fresh hot rolls is removed from the oven and set on a wire rack to cool. At the same time these rolls were baking, we made some broiled portabella mushroom steaks, and had them on these hot rolls with lettuce, tomato and onion. Um Um Good!
The above recipe is in keeping with God's creation intent (Genesis 1:29-31): 'Then God said, "I give you every seed-bearing plant on the face of the whole earth and every tree that has fruit with seed in it. They will be yours for food. And to all the beasts of the earth and all the birds of the air and all the creatures that move on the ground-- everything that has the breath of life in it-- I give every green plant for food." And it was so. God saw all that he had made, and it was very good.' (NIV) Let no animal suffer or die that we may live! (d-5)
| Special Recipe, Photo, and
Information Directory |
| Appetizers |
Beverages | Breads and Rolls
| Breakfast | Desserts
| Fruit Smoothies |
| Main Dishes (Entrees) |
Pizza |
Salads and Dressings | Sandwiches
| Side Dishes | Snacks
|
| Ingredients Description and
Photos |
Utensils and Equipment
| Links |
Your Comments are Welcome:

![]()
![]()
If we REALLY want God to bless America and the earth, GO VEGAN!


| Home Page | Animal Issues | Archive | Art and Photos | Articles | Bible | Books | Church and Religion | Discussions | Health | Humor | Letters | Links | Poetry and Stories | Quotations | Recipes | What's New? |
Thank you for visiting all-creatures.org.
Since ![]()